Electronic Actuated Pneumatic Spudgun
Potato Gun Plans
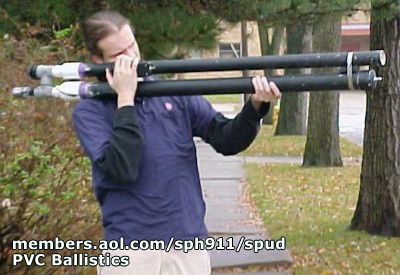
This potato launcher is the typical pneumatic type. It is often referred to as over-under type or bazooka/spudzooka (because of its shape and launch postion).
THEORY OF OPERATION
This launcher has a compression chamber. Air is pumped into this chamber by means of a tire valve. A sprinkler solenoid valve stops the flow from the chamber into the barrel. When the desired pressure is reached, the valve is opened by means of an electronic circuit. Exact pressures can be reached for each shot by measuring with an ordinary tire-guage.
Air then rushes out of the chamber, through the (often small) valve, and into the barrel, pushing the projectile out, to great joy.
MATERIALS.
- 48" SCH 40 1 1/2" PVC Pipe
- 45" SCH 40 2" PVC Pipe
- 1' SCH 40 1" PVC Pipe
- 1 1/2" to 1" Reducing Bushing
- 2" to 1" Reducing Bushing
- 1 1/2" Coupling
- 2" Coupling
- 2" Endcap
- 1" PVC to Male Thread X2
- Milton Chrome Tire Valve
- RainBird Solenoid Sprinkler Valve
- Large Hose Clamp and Block of Wood
- Electronics Box (See Below)
ALL PIPE IS SCH 40! DO NOT USE DWV PIPE!
Potato Gun PLans - ASSEMBLY
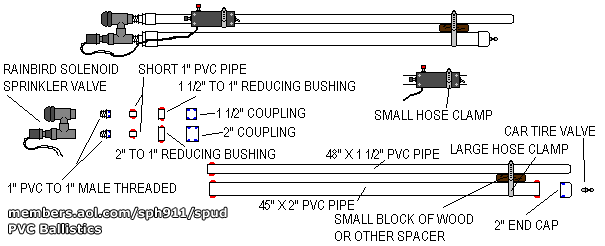
First cut all pieces to length and clean the ends to be glued. Drill a hole in the end cap for the tire valve and screw it in place. Also, taper the firing barrel to shave the spuds. Glue all red areas, and the blue areas inside the couplings. Obviously, do not glue the threads. Glue the pipes to the couplings and let them sit overnight. When ready, screw the pipes to the valve. Teflon tape can be used to insure an airtight seal, however be careful not to tighten too much, or the pipes will be very hard to get off (I had my pipes break due to a fall, and the remaining threaded pieces were extremely hard to grasp. Usually once around the male threads with the tape is good).

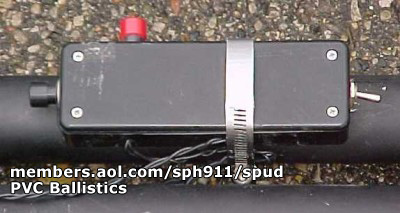
 The compression chamber is 2" x 45". The control box features
a triple safety: a labeled on-off toggle switch, and two buttons which
must be pressed simultaneously to get the cannon to fire. The barrel I
use most is a 1 1/2" x 48" barrel. I tapered the end to help cut the spud
into shape. I also have a two inch barrel.
The tire valve to fill the chamber is a MiltonValve. To the right is a photo of the package and valve. I picked this up at an auto store for 5 bucks. The valve is chrome and one that you bolt in place. The washers and nuts are included, you just drill a tap hole on the endcap of the chamber for the valve.
To make the control box, use Radio Shack parts. Assemble it as shown in the cannon plans, or modify switch location to suit your preferences. This is just a guide, and two switches are not necessary, one is sufficient. All joints should be soldered for maximum efficiency. The valve operates at 24 volts DC so the three 9 volts are ample power, being the valve is opened for only a few seconds at a time.
 CIRCUIT MATERIALS
These are the parts for this circuit. The links go to the part information on the Radio Shack Website.
Momentary
switch, RS# 275-609
SPST
Switch RS# 275-602
Project
box RS# 270-1804
9
volt battery clips RS# 270-325
 Set the control box against the firing barrel and use a small hose
clamp to secure it. Then insert a block of wood or something similar
near the business end of the launcher and use a large hose clamp to
secure them.
Altogether, this cannon cost approximately $47. $12 for valve, $15 for pipe (sold in 10' sections) and fittings, and about $12 for batteries and electronic parts. It has been a while since I built this, so I cannot give you a more accurate price guide yet.

